Hey everyone! I just wanted to share a few things I learned when I first started selling on Etsy. So let’s get right into it!
Link to my Etsy Account: Sandy Paws & Co.

Product Photos
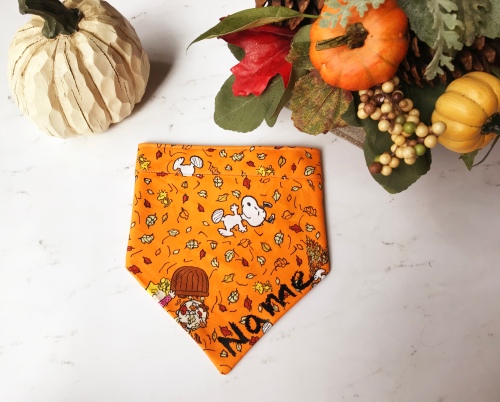
Think about it, if you go online to buy a product and the pictures used to promote it are subpar at best, you probably won’t be too confident in making that purchase. You might not even make that purchase at all. A lot of times people buy with their eyes, and if what they’re seeing isn’t great, they might move on to another seller with more appealing product photos. Taking quality photos isn’t difficult really. All you need is to buy a few simple items from the craft store and BOOM you’re in business…literally. I took the photo below using marble print contact paper that I purchased from Joann Fabrics and some fall décor I use around my house at Thanksgiving. I use an app called Camera +2 and take the picture from different angles to see what looks best. The thing that I like about the Camera +2 app is that it will auto correct to straighten and sharpen the picture which makes it very user friendly.
Search Engine Optimization (SEO)
Search Engine Optimization or SEO for short, is a means of bringing more traffic to your site by increasing its visibility through things like product titles, product descriptions, and tags. Try to capitalize on this by adding specific words that you know are popular or frequently searched for. Sometimes it will take a while for you to figure this information out. For my shop, this was Harry Potter. My top selling products were anything Harry Potter, so I always added that to my tags, titles, and descriptions. Along with specific character names, Hogwarts Houses, items from the movies etc… You are allowed 140 characters for your titles and 13 tags, so make the most of all of those opportunities!
Marketing
After you have become familiar with your SEO, you might want to try out some marketing options for your shop. I chose to use both free and paid for options. The free option was social media. This proved to be more work than the paid for options (obviously). But even with the extra work, it was worth it. I was able to host giveaways and put my new products out there for the public to see. By doing this I would direct people to the “link in my bio” so they could check out my full Etsy shop and all the products I had to offer. Another way to market your products is to pay Etsy to do it for you. This is where I found most of my marketing success. Basically, what Etsy does is place your product at the top of a search when someone types in a product description that matches one of your listings. This may be a good idea to bring more visibility to your products when launching your shop. Additionally, I just recently read that Etsy is now only charging for advertised products that are purchased. Before, they would charge simply when someone clicked on your listing, even if they didn’t purchase the product. I lost a lot of money that way and I’m sure others did too so you can imagine my excitement for this new development!
Make Multiple Products
This one is simple really, the more products you make, the more likely your shop is to get noticed by different types of people. If you are trying to make money off of your shop, try to open your mind to products other people would like, not just what you would like. Or don’t. Your shop, your choice.
Customer service
I was HUGE on customer service with my shop. I always tried to treat people the way I would like to be treated. If I messed up an order (which only happened one time because my computer autocorrected a name and I didn’t notice – gosh darn it) I offered to fix it immediately. I even threw in something free because I wanted to make sure that person was completely satisfied. I know a lot of other Etsy sellers would not throw in something for free, so I did it to stand out. And guess what? I got a 5/5 rating from that person. In fact, I got 5/5 ratings from every customer that left a review. This is very important because customers monitor reviews hard core. I sent a personalized thank you note with each purchase to include the buyer’s name because I wanted them to know how much I appreciated their business. In the note I asked them to leave a review on my Etsy page, or post a photo to Instagram and tag me. The more good reviews you have, the better! Try to keep yours squeaky clean so the customer has nothing to worry about when considering your product.
Be original
There are sooo many products out on Etsy right now. Try to make your product original. Make it stand out from the rest in some way. I made dog bandanas, but instead of making them tie bandanas, I made them Velcro bandanas. This made mine stand out from the rest, and the fact that it was low maintenance was a good marketing angle. A lot of my customers mentioned that in their reviews of my products.
Enjoy making your product
This might seem silly, but if your product starts to sell, you’re going to be spending a lot of time making it. If you’re not enjoying what you’re doing, you probably won’t be selling on Etsy for too long. My shop supported my Starbucks obsession and provided an escape from the anxieties of my everyday life. I also loved seeing my finished products on my customer’s doggos!